I miss the days when a Windows computer never left the office. Back then joining a computer to a Microsoft Active Directory (AD) domain was simple. But humans had to go screw that up by inventing the laptop, the Cloud, and Microsoft EntraID.
Now joining a domain is a complicated mess that is made more difficult by Microsoft, Dell, HP, Lenovo, and Omnissa using different names to describe the domain join process. Today’s blog is an attempt to clear up the confusion. Let’s start with a visual aide:
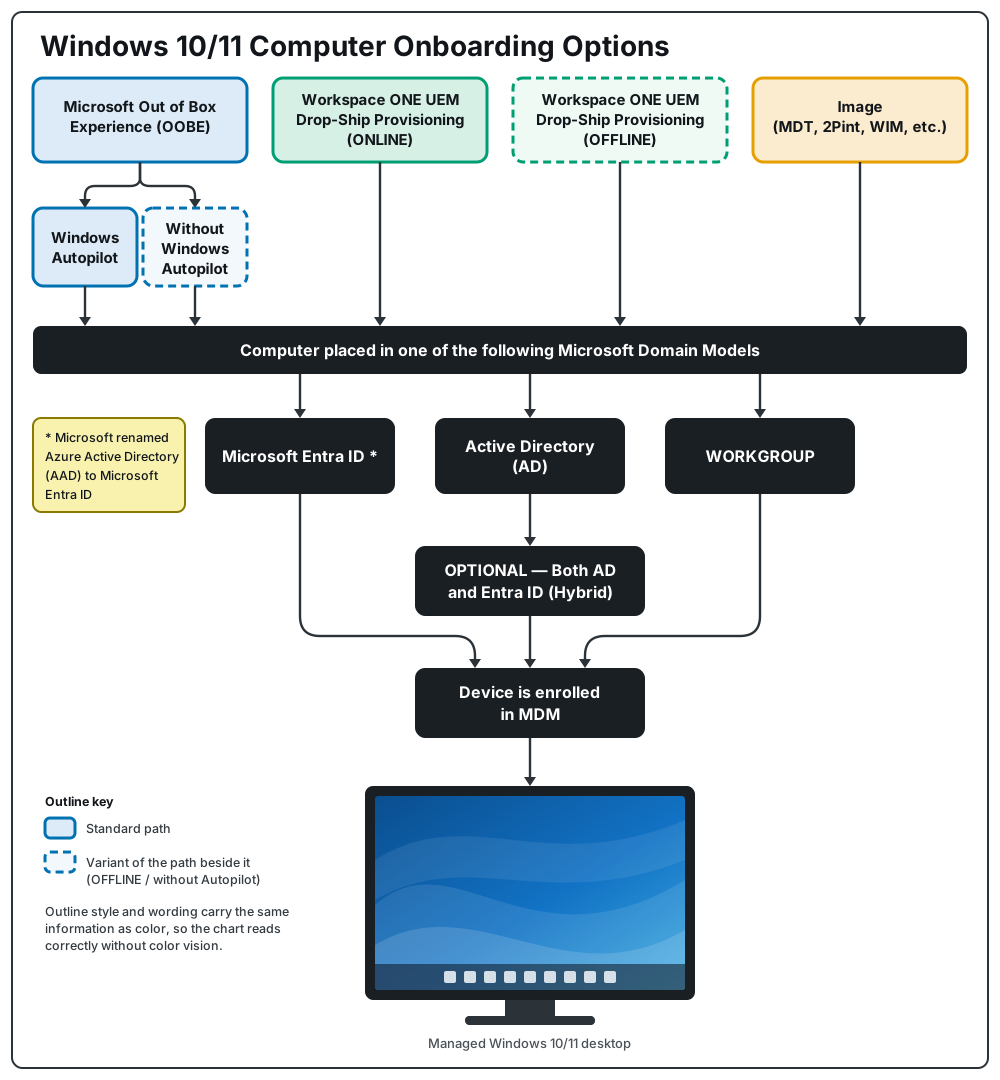
The four boxes at the top of the illustration summarize four unique device provisioning methods. Each of the four methods can be used to get the computer to join a domain; however each of the four methods uses different technology and has different requirements for how the domain join occurs.
The remainder of this blog will break down each one of the four in detail. In practice many customers will leverage more than one of these methods.
Bonus tip – scroll to the end of the this blog for a script that can be used to build an automated USB-key that can be used to configure all of the methods described.
Method 1: Microsoft Out of Box Experience (OOBE) and Microsoft AutoPilot
The Microsoft Windows 10/11 Operating System (OS) contains multiple installation, setup and configuration phases. OOBE is the phase after the OS installation phase is complete and begins at the screen seen below:

OOBE is intended to seen by Consumers who purchase a new computer from a retailer for home use. During OOBe a series of questions will be asked in order to configure the OS as the user prefers.
In Windows 10 OOBE asks the end user 13 questions. That’s 13 mouse-clicks of decisions the end user must make before they can begin using the computer.
For historical purposes, the original 13 questions were as follows:
- What region is the device in?
- What keyboard layout do you prefer?
- Do you need a second keyboard?
- Is this your computer or your company computer?
- What Wifi network do you want to join?
- What Microsoft account will you sign in with? (a.k.a Join a Domain or Workgroup)
- What user account do you want to create?
- What’s your super memorable password?
- What three questions do you want me to ask you when you forget your super memorable password? What are the answers to the three questions?
- Do you want to use Cortana?
- Do you want to buy Microsoft Office?
- Do you want to store all your data in OneDrive?
- Is your device primarily used for gaming?
With Windows 11, Microsoft updated the graphics and colors of the OOBE screens, and they added more questions. The additional screens are mostly Microsoft attempting to up-sell licensing for more OneDrive storage, buying licenses for Microsoft Office or optimizing your PC for tasks like Entertainment or Gaming.
OEM’s like Dell, HPE, and Lenovo also have the ability to introduce additional OOBE questions with many of the OEMs choosing to include hardware warranty registration questions as part of OOBE.
The entire OOBE experience is something most I.T. Administrators want to turn off.
The computer Domain Join portion of OOBE begins at what was originally Question 6:
What Microsoft Account will you sign in with?
The options at this point are for the end user to choose:
- Microsoft Account
- Login with a Microsoft Azure Account (now renamed to Microsoft EntraID)
- Join the computer to a Windows Workgroup or join a Domain
In an Enterprise this is not a question that you should be asking your end users, it’s an administrative decision that should be made on their behalf.
Microsoft only allows this decision to be made for the end user if the organization buys a license for a configuration option named Microsoft AutoPilot.
Microsoft AutoPilot gives IT Administrators the ability to interrupt the OOBE process when OOBE reaches the question: “What Microsoft Account will you sign in with?” and make the remainder of the decisions on behalf of the end user.
Unlike OOBE, which ships as part of the OS, AutoPilot is a Microsoft Cloud Service that lives in Microsoft Entra. The service is configured by logging into the Microsoft Intune Administrator Console.
Microsoft AutoPilot requires I.T. administrators to purchase a Microsoft Entra ID P1 license for every user. In order to access the configuration page for Microsoft Autopilot, the I.T. Administrators must also be able to login to https://intune.microsoft.com which means the I.T. administrator must purchase a single Microsoft “Intune Plan 1 Device” license.
After licensing and configuring Microsoft AutoPilot, the OOBE Question “What Microsoft Account will you sign in with?” is replaced with a corporate branded question that asks the user to login using their corporate email address.
From there the process is mostly automated. If all goes to plan the next screen the user sees will be the Windows login prompt at the end of the experience.
Below is a visual of the Microsoft AutoPilot Workflow as it exists in Windows 11 26H1:
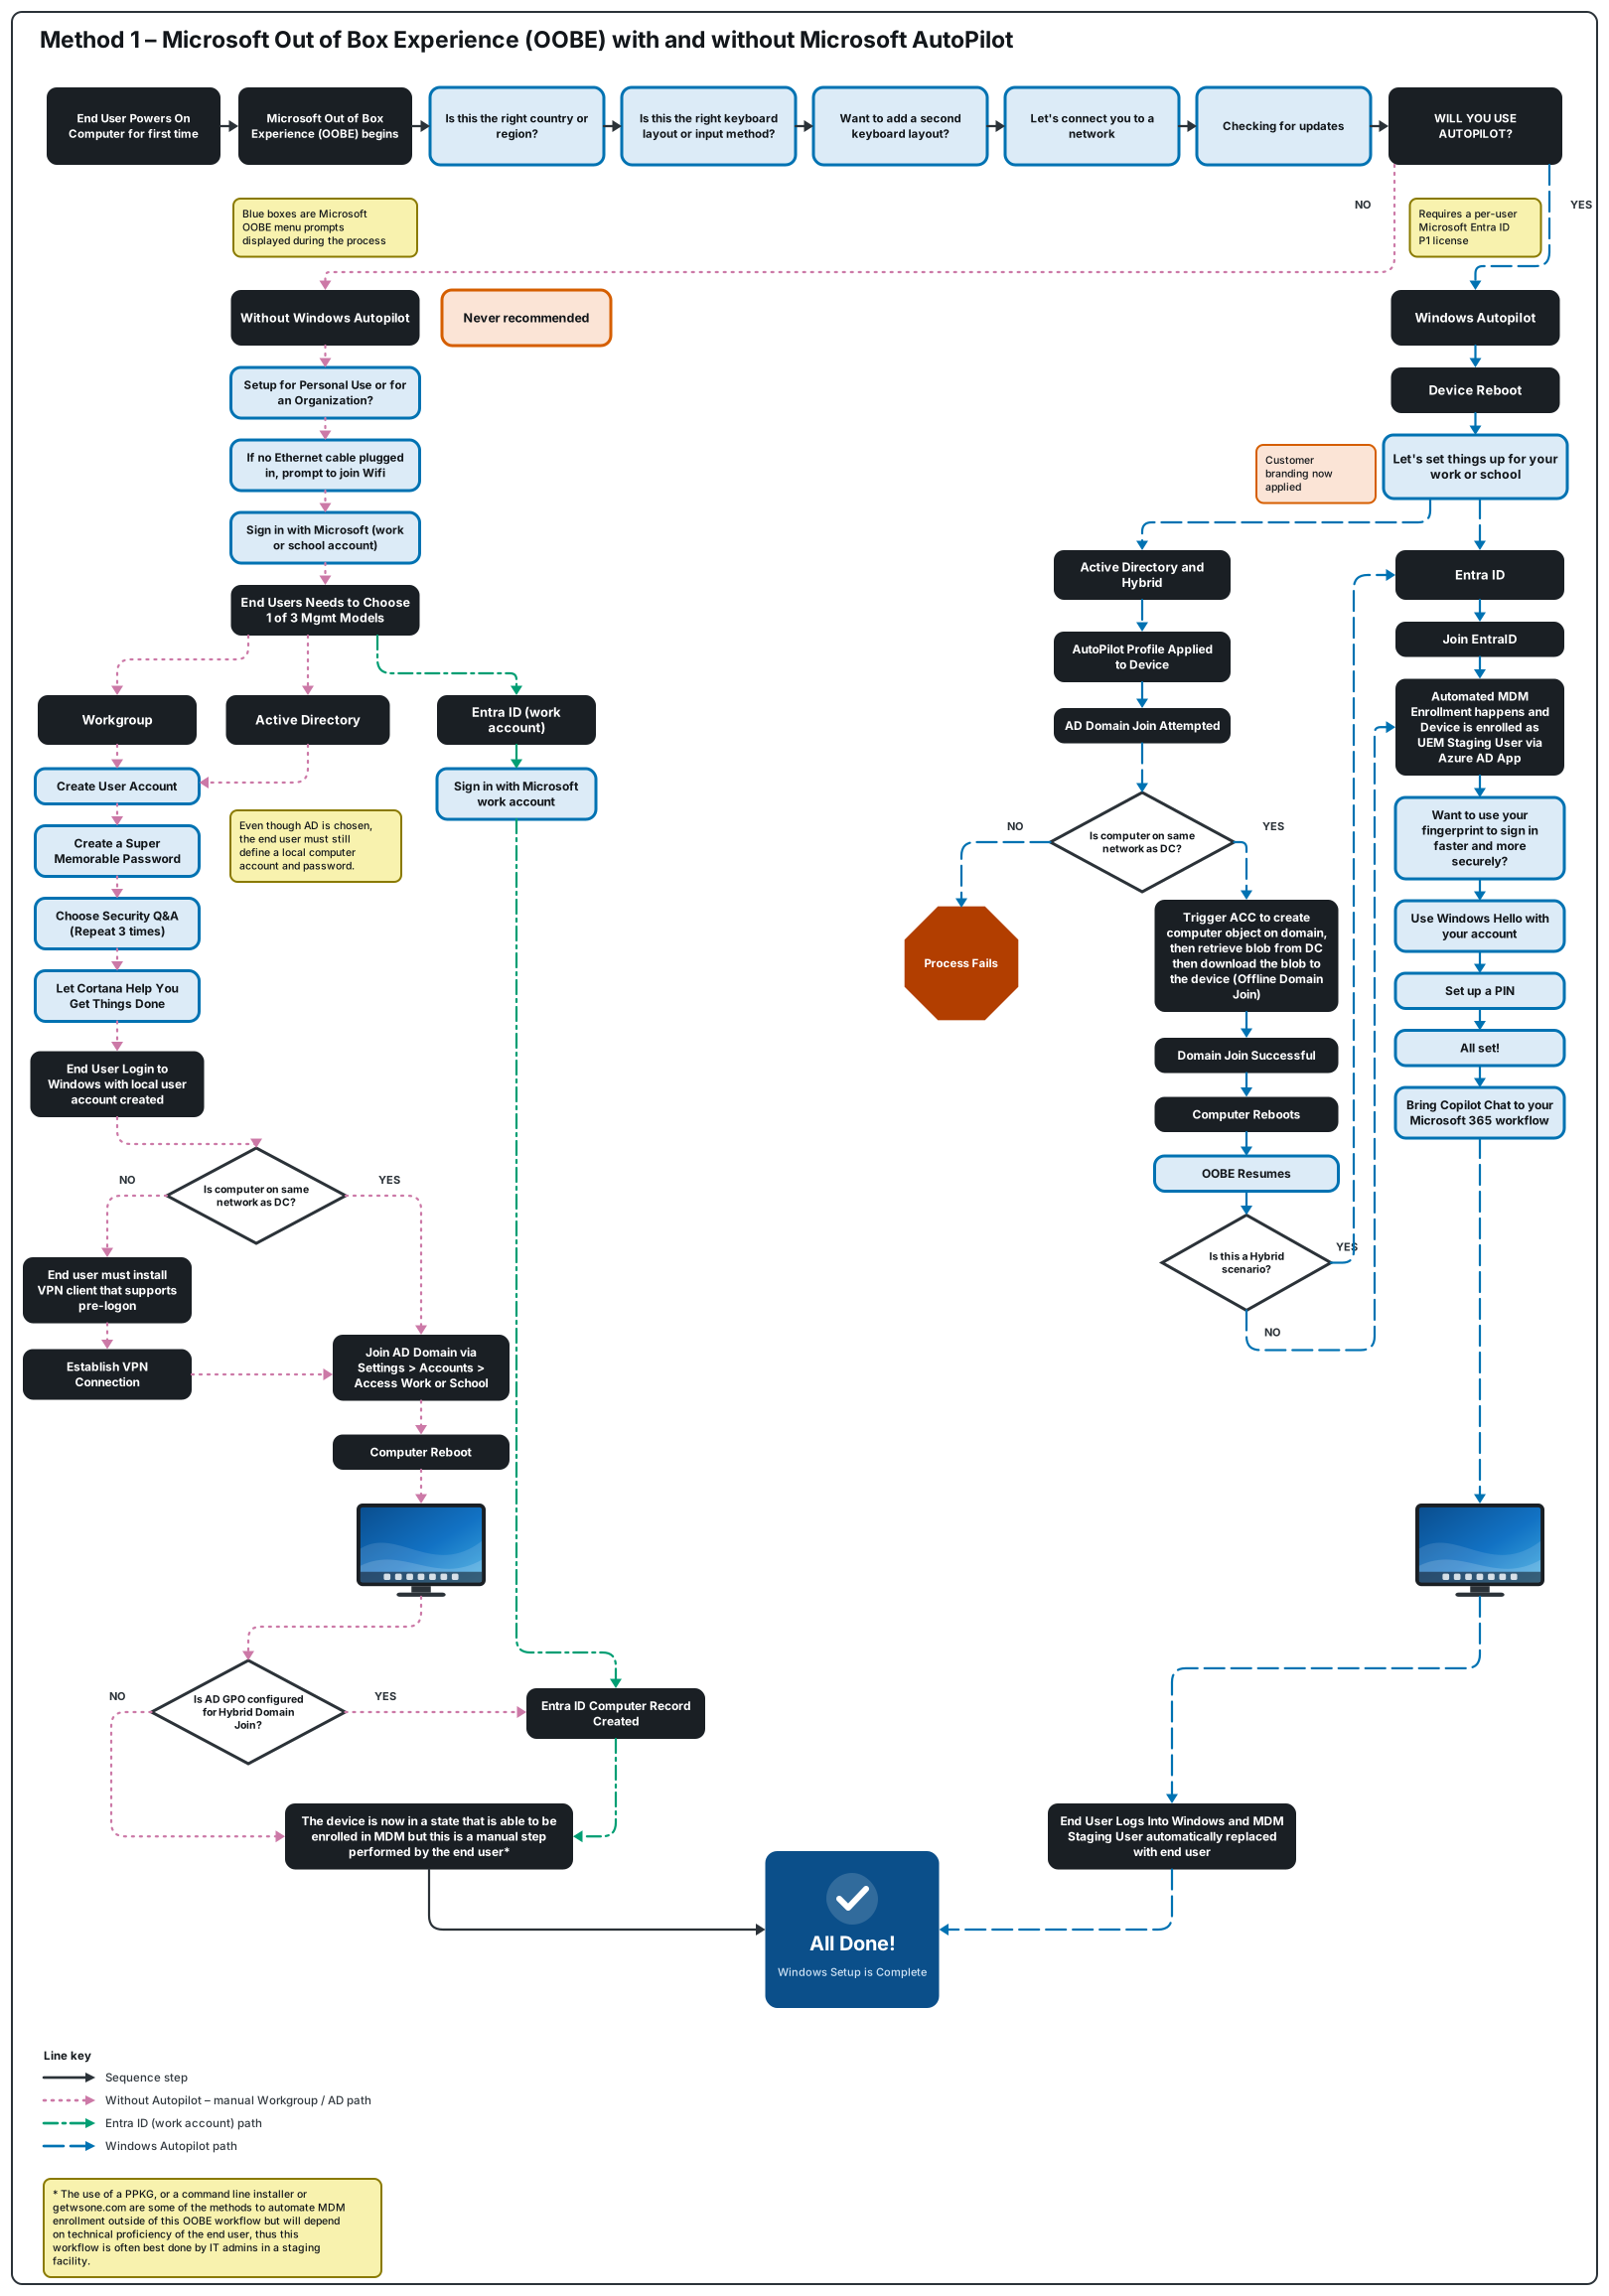
One of the biggest advantages of using OOBE and Microsoft AutoPilot is that it works on any version of Windows 10/11 from any hardware manufacturer.
The biggest disadvantage is that Microsoft AutoPilot won’t function until the device has been registered with Microsoft. The registration process is something that is done by the OEM at the factory, or by the I.T. Administrator BEFORE the device is shipped to the end user, but this registration requires coordination and sometimes an additional fee from the OEM.
Another disadvantage to Microsoft Autopilot is that it is designed to place computer objects in Microsoft Entra ID, not Active Directory.
Microsoft eventually added support for Hybrid Domain Join, where the computer joins AD, reboots, then joins EntraID however this reduces the portability of the device because Hybrid Domain join requires the device to have direct line-of-site to a domain controller and won’t work over a VPN.
For organizations that require pre-installation of large Windows applications, OOBE + AutoPilot + MDM can be a challenge based on the devices Internet connectivity. Many organizations that use OOBE + AutoPilot still ship laptops from the OEM direct to the corporate office where the initial configuration can be done using a corporate internet connection.
In summary, Microsoft OOBE + Microsoft AutoPilot + MDM is a great fit for organizations who pay for the Microsoft licenses to use it and are ready to fully embrace Microsoft EntraID.
For more information on how to configure Microsoft Autopilot and Workspace ONE UEM the Omnissa Techzone website offers a great tutorial here.
P.S. If you insist on using Hybrid Domain Join with AutoPilot (something I personally think should NEVER be done), I detail how to configure Workspace ONE to implement OOBE + AutoPilot + MDM + Hybrid Domain Join in a different blog found here:
Method 2: Workspace ONE UEM Drop-Ship Provisioning ONLINE
Workspace ONE UEM Drop-Ship Provisioning (DSP) comes in two versions: Online and Offline
DSP ONLINE does NOT support Microsoft EntraID join.
I will repeat that. If your Windows device needs to join Microsoft EntraID this method can NOT be used. Stop reading and scroll down to the next method: Method 3: Workspace OEN Drop-Ship Provisioning OFFLINE.
A history lesson:
Airwatch created DSP Online in partnership with Dell prior to the sale of Airwatch to VMware. The original intent of the service is that customers purchased a computer from an OEM and paid for a licensing SKU from the OEM to provision the windows computer.
The benefit of this method is that new PCs were no longer shipped to IT departments for provisioning, instead they are shipped directly to end users who power them on and are presented with a Windows login screen instead of being forced through OOBE. It’s the Utopia of Windows OS Provisioning.
Since the original release of DSP Online
- Airwatch was acquired by VMware.
- VMware was acquired by Broadcom.
- Broadcom sold off the EUC division (Airwatch and Horizon) to KKR who created a new company Omnissa.
What got lost in all this corporate shuffle is the ability to purchase a license for DSP Online from any OEM. As we approach the end of the year 2026, there’s no general SKU available for purchase from any of the OEMs for DSP Online.
The SKU was meant to simplify the conversation between a customer and an OEM and it provided a simple method to pay an OEM for provisioning the device. With no SKUS available, this just means that it is up to the customer to implement DSP Online on their own.
Practically speaking, this means purchasing a computer from an OEM or Reseller, having the OEM send the computer to the I.T. department and then having I.T. use DSP Online to configure the computer before sending it to the end user. The only licensing fee now associated with DSP Online is the Workspace ONE License you likely already have.
Despite the original name, this process has never been Dell hardware specific and will work on any x86 Windows computer. Windows ARM devices and NVIDIA RTX Spark devices are not supported.
In the Workspace ONE UEM Console DSP Online is found by navigating to Devices > LifeCycle > Drop Ship Provisioning.
The remainder of this section goes into detail on how Dell implemented DSP Online at their factory as part of the paid SKU. The purpose of illustrating this is to show Omnissa Administrators how they can re-create this flow in their own environment, adjusting various steps along the way.
Below is a visual of the DSP ONLINE process as originally implemented DIRECTLY AT DELL
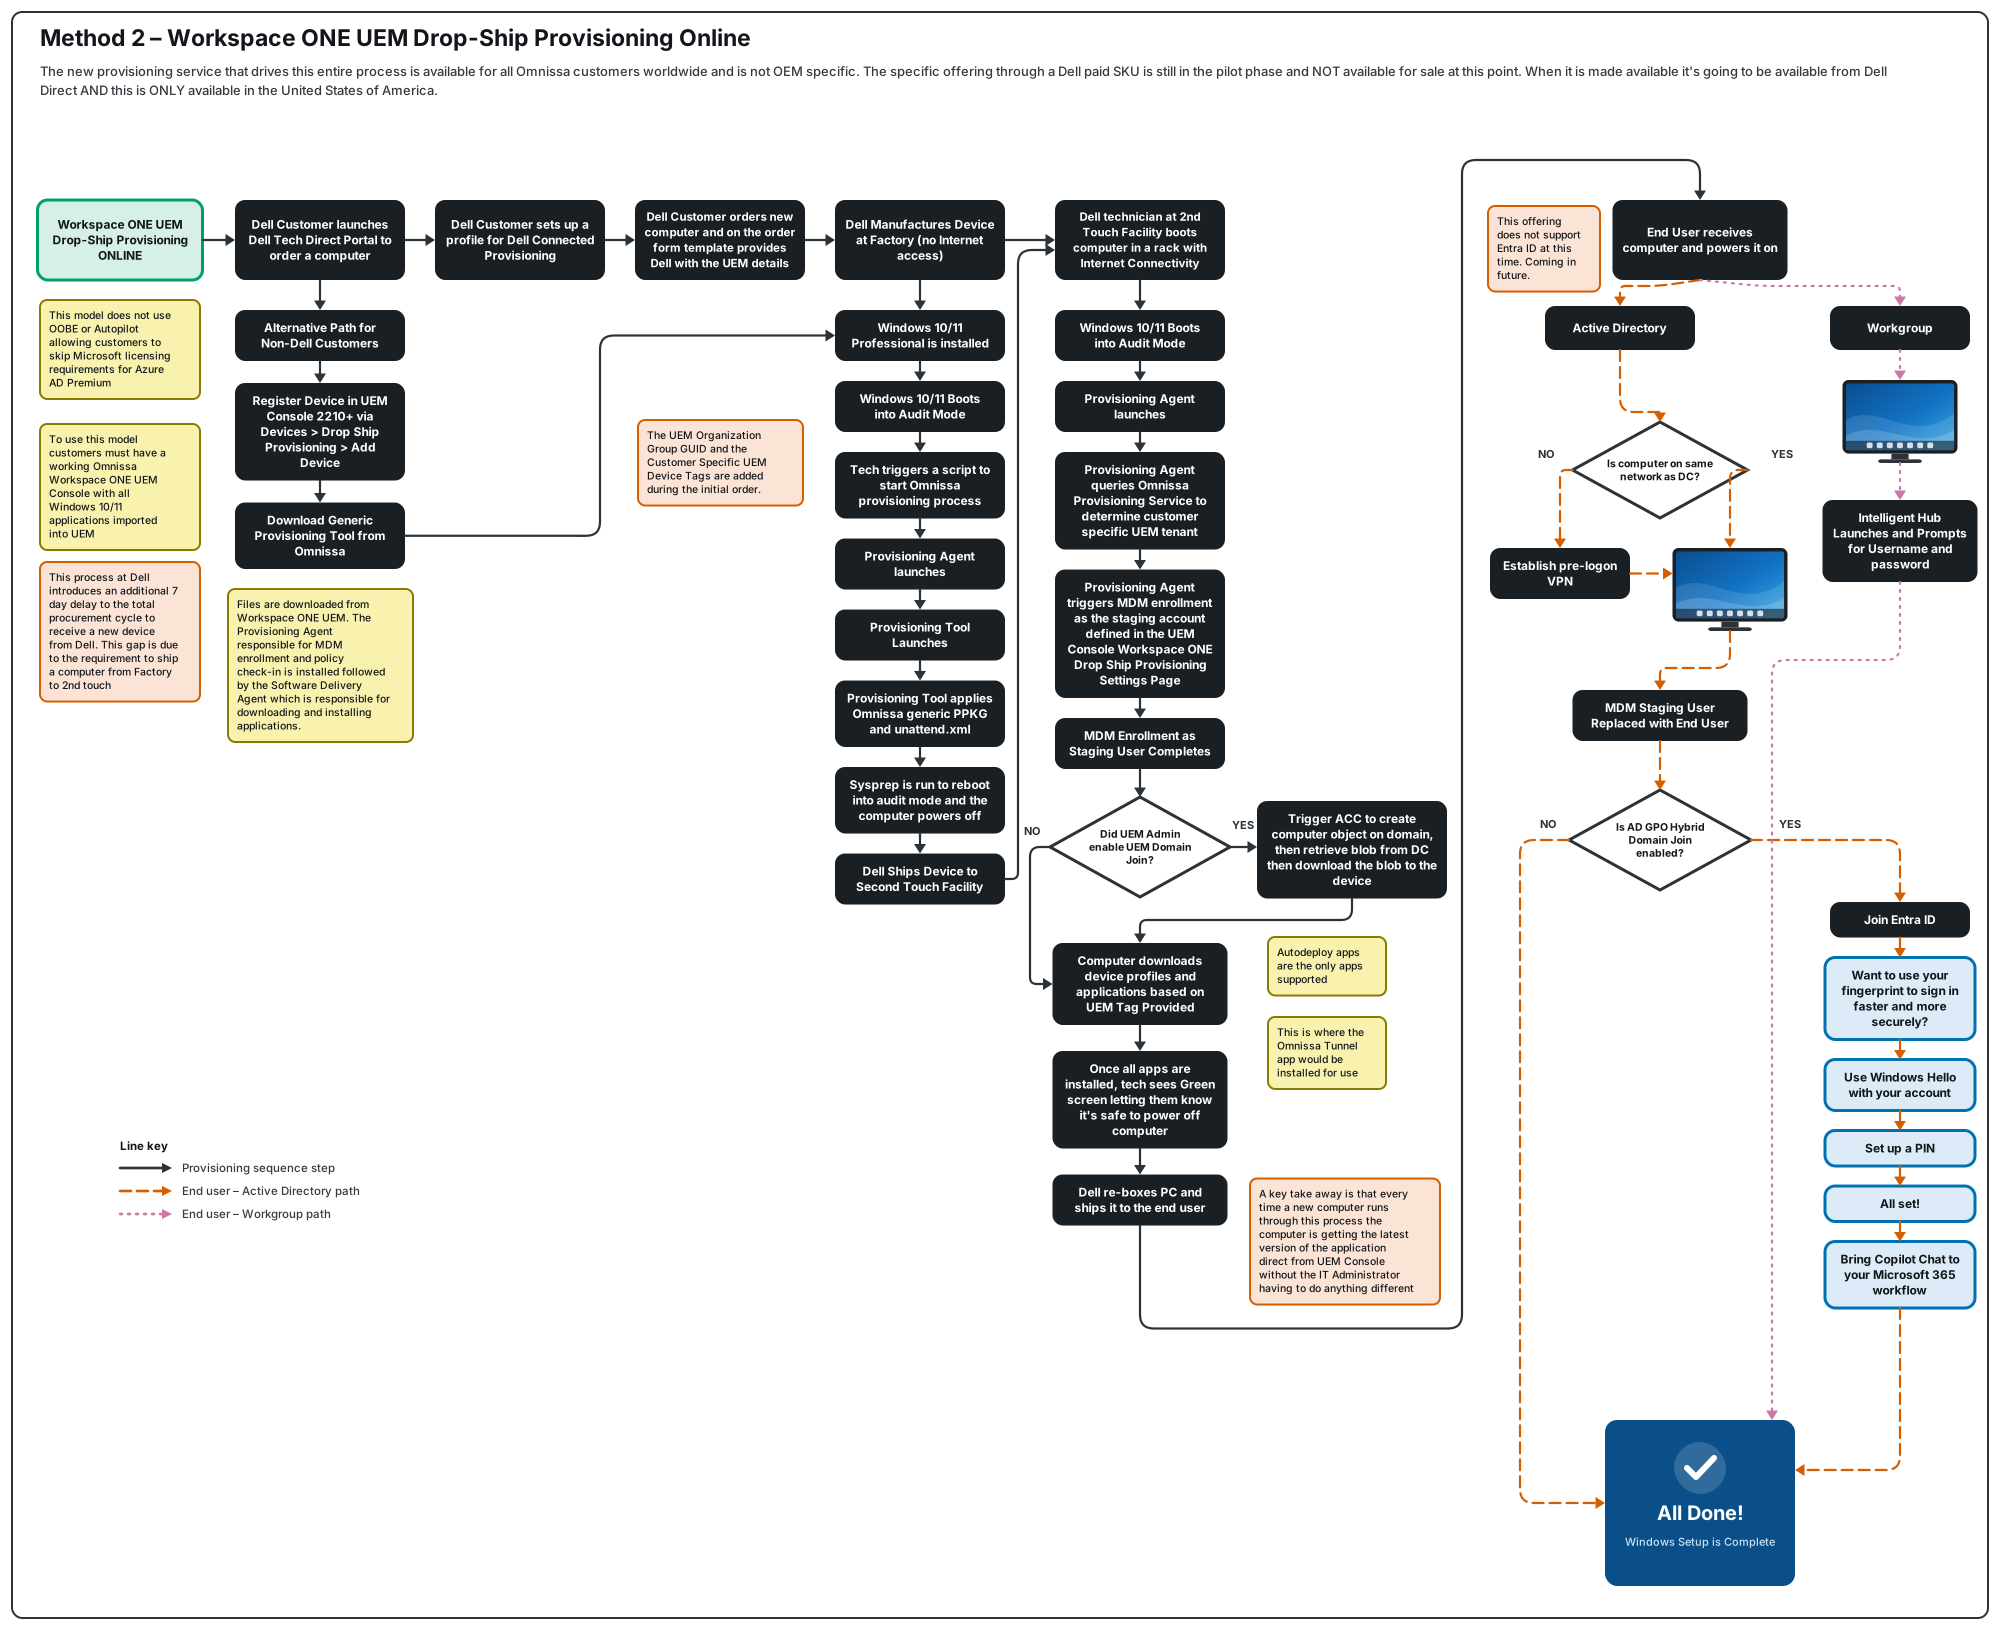
The main reason to understand the process above is because this is the preferred Omnissa OS provisioning process. If you want Windows to join AD or Workgroup join this is your best path forward.
The rest of this section details the steps that are visualized in the image above.
The generic Omnissa unattend.xml and .PPKG file include a set of scripts that install the Workspace ONE UEM Intelligent Hub app on the computer and includes the information required for the Windows computer to reach out to the Omnissa Device Provisioning Service the next time the computer has access to the Internet. The unattend.xml does NOT include any information to join the computer to the domain. Sysprep is run and the computer is powered off.
Dell puts the computer in a box and ships the computer to what they call a Second Touch Facility. At this point the computer is NOT enrolled into MDM and no customer specific information is on the device.
Note that Dell reserves a 7-day window to get the computer from the Factory to the Second Touch Facility
The Second Touch Facility is different from the Factory in that the computer is plugged into a rack that has access to the Internet, This opens the computer up to over-the-air configuration options.
When the computer arrives at the Second Touch Facility a Dell Technician boots the computer with Internet Access and the computer is now able to communicate with the Omnissa Provisioning Service.
The Omnissa Provisioning Service is responsible for linking the computer to the customer specific Workspace ONE UEM Console in order to complete the MDM enrollment.
With MDM Enrollment completed as a generic staging user, the UEM Console uses a Workspace ONE UEM Device Tag to trigger the Workspace ONE UEM Domain Join process. The Workspace ONE UEM Domain Join process uses Microsoft Offline Domain Join (ODJ) (djoin.exe) to complete an offline domain join. For a detailed explanation of ODJ check-out my other blog found here.
After the ODJ completes, the computer will download and install all of the applications assigned to the computer by Workspace ONE UEM. Note that User-based application and profile assignments are not possible at this stage.
If you are joining the computer to AD, in order to gain line-of-site to a Domain Controller, it is expected that one of the applications that must be included in this workflow is a VPN client that supports pre-login VPN. The reason a VPN client is required is because while the device is joined to AD via ODJ, when Windows boots to the first login screen, there is no cached credential for login, so Windows needs network line-of-site to a DC in order to authenticate the user account to allow the user to sign in to Windows. Remember that the end user is going to receive this computer and originally the end user was expected to be working from home, not from a corporate office. Post covid and with 2026 Return to office mandates you may find you no longer need a VPN for this process as your employees might be coming back into an office.
With this process, all of the applications are coming directly from Workspace ONE UEM over the Internet. The process waits until all of the applications have downloaded and completed the installation as defined in the UEM Console. Then the computer is powered off. Dell boxes the computer and ships the device directly to the end-user.
When the end-user receives the device and powers it on for the first time, the VPN client loads as the Windows Operating System is booting enabling the device the line-of-site to the domain controller which allows two things to happen: the end user is able to login to the Operating System using their AD credentials AND Workspace ONE UEM is able to switch the device registration from the generic staging user account to the end user’s account which allows user-based app and profile assignments to be triggered.
The biggest advantage to DSP Online is that there is no OS image to maintain (it’s up to the OEM to install the OS) and there is no PPKG to create then send to the OEM. This is also more secure because it ensures that the latest versions of an application are deployed, instead of hoping the image was updated and then replicated to the OEM. A final advantage is that because the app installs happen at the Dell 2nd touch facility, the end user is spared the time required to download and install the apps making them more productive form the time they receive the computer.
In Summary, DSP Online does not use Microsoft OOBE or AutoPilot. As a result Microsoft Entra ID join is not supported using this method.
While Hybrid Mode is not directly supported at the Factory, it is possible to achieve Hybrid mode if Microsoft AD GPO is configured to do so post onboarding. I document how to configure the AD GPO to achieve this in my blog found here.
For a complete step-by-step guide on how to configure DSP Online it can be found here.
Method 3: Workspace ONE UEM Drop-Ship Provisioning OFFLINE
Workspace ONE UEM Drop-Ship Provisioning (DSP) Offline is another option to consider. A brief history lesson: this method went to market under the name “Dell Factory Provisioning” and was then renamed to “Factory Provisioning” before settling on its current name “DSP Offline.”
Despite the original name, it has never been Dell hardware specific and will work on any x86 Windows computer. Windows ARM and NVIDIA RTX Spark devices are not supported.
In the UEM Console this option is configured from Devices > Staging > Desktop Staging.
Note: What you can NOT do with this method is ship the computer directly to an end user that is off the network. DSP Offline, when used for AD domain join, is designed to be completed on the corporate network by the IT Administrator.
The way this works is that DSP Offline provisions a Windows device using an unattend.xml and .PPKG file that is created from the UEM Console. The unattend.xml includes the domain model to be used and the .PPKG contains all of the applications that need to be installed on the device. These two files are sent to whatever entity is responsible for provisioning the device and must be installed on the device in Windows Audit Mode.
The process generally looks like this:
- Computer is manufactured
- Windows 11 Professional Edition is installed on the computer
- Computer is shipped to I.T. Professional
- Windows 11 Professional Edition is booted into Windows Audit Mode
- The Omnissa Factory Provisioning Tool is run in Windows Audit Mode
- Microssoft Sysprep runs to reseal Windows
- I.T. hands the computer to the employee who boots it in the corporate office
A key detail about the .PPKG is that it is a point-in-time snapshot of the applications. There is no method to update the applications except to generate a new .PPKG. Compare the use of the .PPKG to the DSP ONLINE workflow (where applications are installed directly from the UEM Console and no .PPKG is involved) and it starts to make sense why the process is named DSP OFFLINE.
Below is a visual of the DSP OFFLINE process:
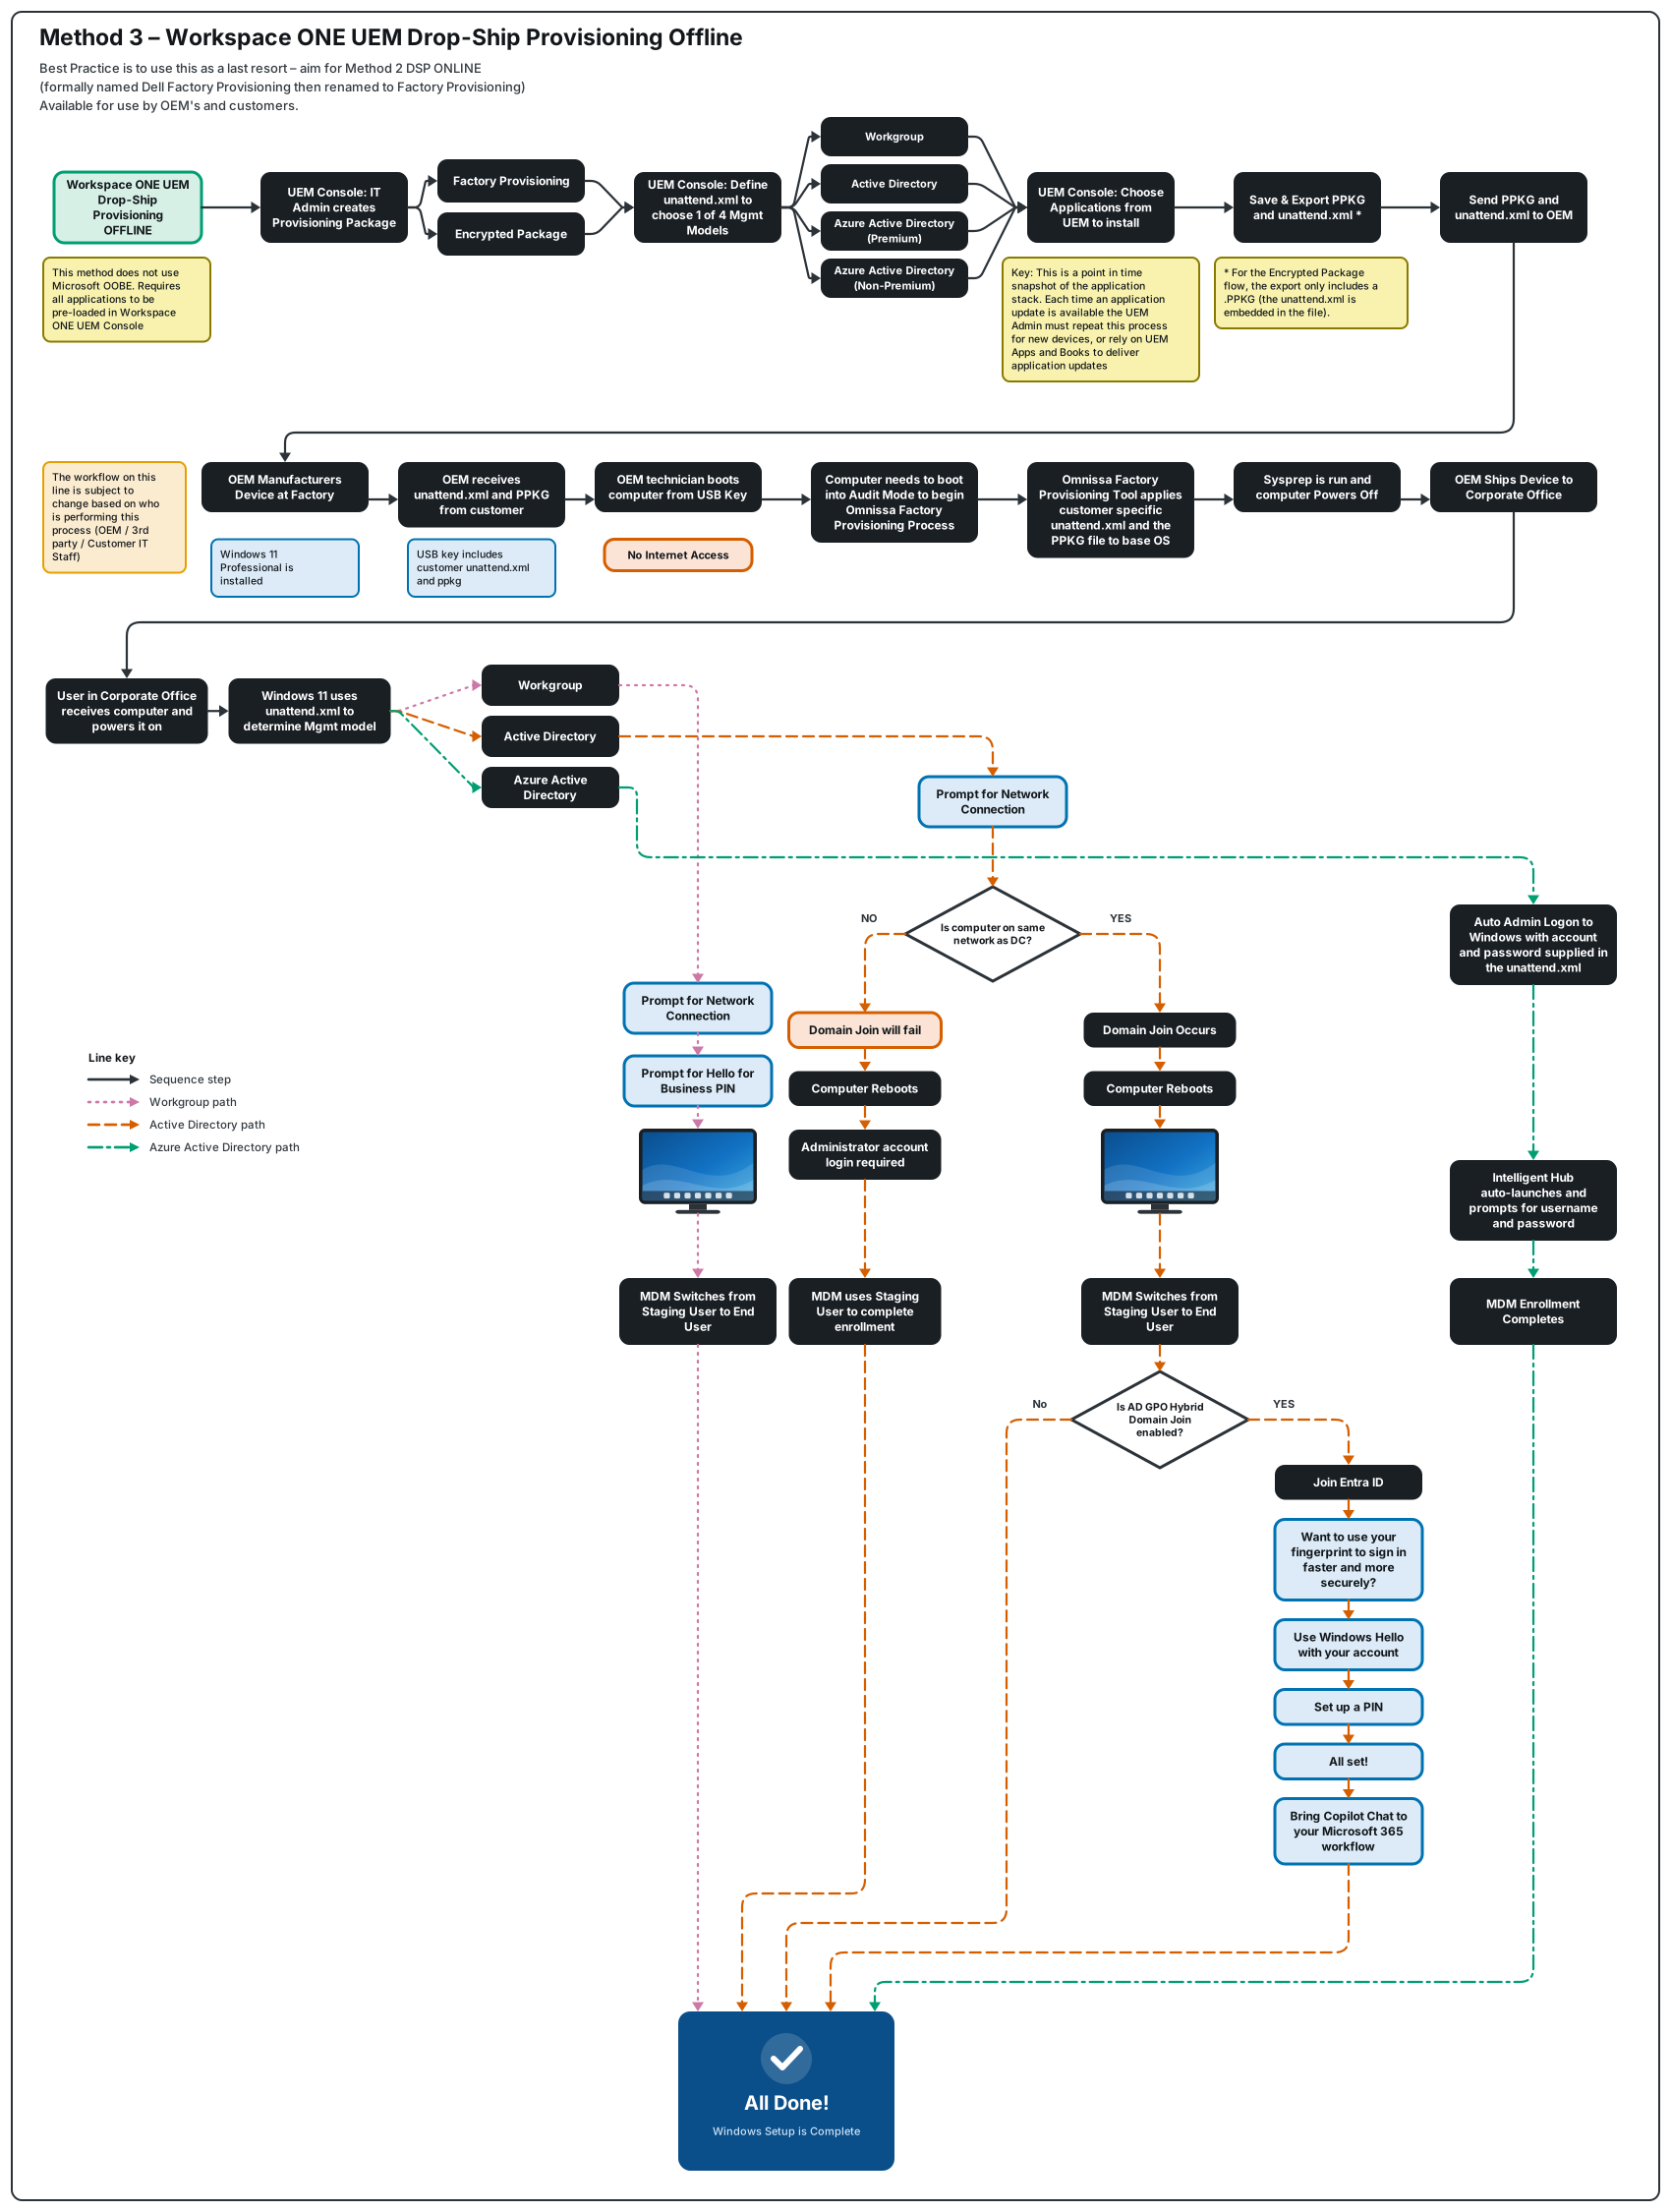
In summary, DSP OFFLINE is different from DSP ONLINE in that it uses a customer specific .PPKG (with the customer’s application stack included) along with a customer specific unattend.xml that tells the Windows OS what domain model to join.
DSP OFFLINE supports EntraID join, AD join, and Workgroup domain models without requiring the purchase of Microsoft AutoPilot licensing. The trade-off is that it requires computers to be provisioned on the corporate network.
Hybrid Domain join can also be achieved with DSP OFFLINE by leveraging the AD GPO process as described in the blog found here.
Bonus Tip: While I started this section saying it’s not supported to use this method off-network, there is a method that allows this to work, though it’s not supported by Omnissa Tech Support. Check it out here.
Method 4: Traditional Imaging tool (Microsoft SCCM, Microsoft Deployment Toolkit (now retired), 2Pint, etc)
I include Imaging because despite what you may have heard, modern management does not support Bare-metal OS Deployment.
Break-fix scenarios do still occur and Imaging is a valid solution to break-fix. Imaging is also heavily leveraged by Virtual Desktop solutions like Omnissa Horizon so it’s a technology that is not likely to go away anytime soon.
In all of these tools there is some form of automated boot process usually based on PXE. The computer boots into PXE, receives Windows PE, then either launches what amounts to glorified copy-and-paste job, or they download and run through the Windows OS installation process. The end result is usually a duplicate of the source computer where the OS, the apps, and any other configuration items are now replicated to the new device.
The argument for continuing to Image a computer is based on time of completion. It’s faster. Most of the time. To copy-and-paste (over simplified, but true) an entire OS + Apps + configuration is often much faster than downloading an OS, installing the OS, then downloading and installing all the apps, then waiting for app installation and subsequent configuration. Speeds and times vary and modern hardware with SSD and/or NVME make this less of a problem today but as a general rule of thumb imaging is usually completed in 15 minutes or less.
Below is a generic visual of the traditional Imaging process. Each vendor will offer their own special flavor of this concept:
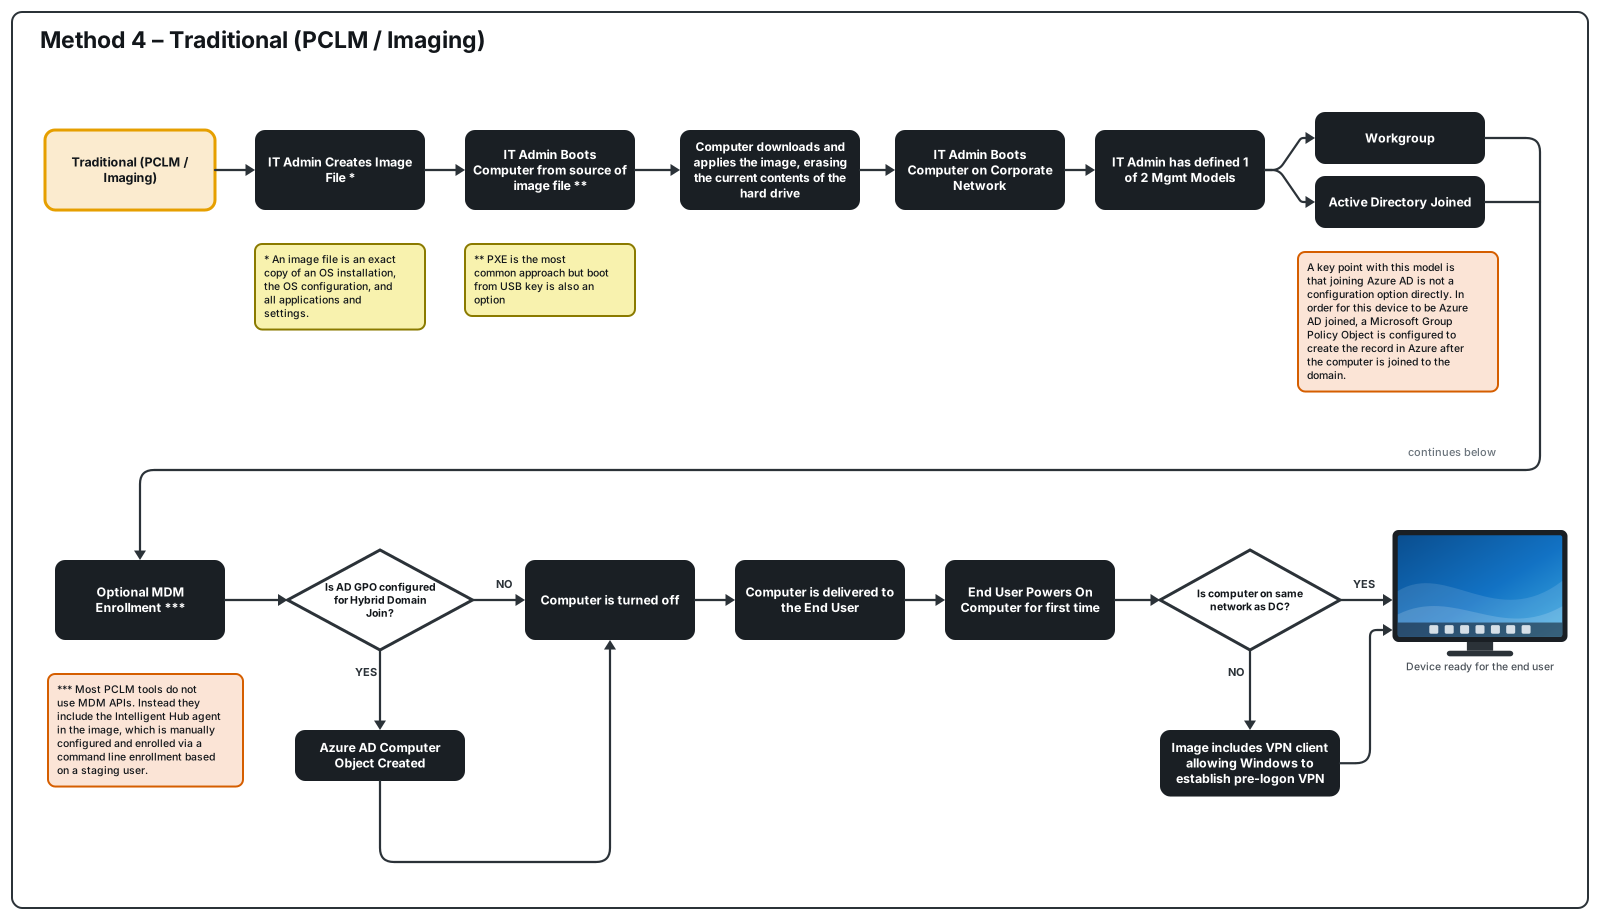
The advantage to imaging is that the computer will be joined to AD or a workgroup as part of the image creation process, or through the task sequencing if using a tool like Microsoft SCCM or the now defunct MDT.
While Imaging solutions do not support EntraID join directly, AD joined computers that are imaged would also follow the same AD GPO process described in the previous two sections to achieve hybrid configuration.
As Imaging is not a solution provided by Workspace ONE UEM no further details about this method will be discussed as part of this blog.
How to test these methods – Automating the OS Installation via USB-Key
With the exception of Imaging, none of the methods discussed above install the OS or prep the OS for what is required to use each method. For testing and demonstration purposes I’ve found using a USB Key to be the most effective method to try out each method. What follows is the process I follow each time Microsoft release’s a new version of Windows.
To get started grab a USB key with at least 32GB of space available. It will be ERASED as part of this process.
Download the latest ISO from Microsoft for the Windows 11 installation media you plan to use. In all of the scenarios above it is expected that your OS is the Professional Edition. You can upgrade to the Enterprise SKU as part of the provisioning task, but the base OS is always recommended to be Windows Professional Edition.
From a Windows 11 computer, MOUNT the downloaded Windows ISO.
Insert the USB Key.
Download and run this powershell script from my GitHub page:
createmedia_menu_surface_v35.ps1
The end result will be a bootable USB Key that can be adopted for any of the methods above.
The next step is to boot the target computer from the USB-Key.
Walk through the USB-key boot menu process.
When Windows Setup is finished, the device reboots and OOBE launches, indicated with the question:
“Is this the right country or region?”
This is the staage to unplug the Ethernet Cable and/or disconnect the device from Wifi. This is because the current DSP Online and Offline process will fail if the device has internet connectivity. Leave ethernet/wifi connected if you are going to register the device with Microsoft AutoPilot.
Press Ctrl_Shift_F3 to reboot the device in Windows audit-mode. The machine will auto login to Audit Mode as the built-in administrator account.
The OS is now ready to do AutoPilot registration, or DSP Online, or DSP Offline.
2 thoughts on “A Beginner’s Guide to Windows Domain Join using Workspace ONE UEM”